An inverter power supply suitable for valve radios is described.
This inverter uses a small single sided Printed Circuit Board (PCB). Use the overlay to position the components. Test all the resistors, diodes, transistors, and capacitors before using them. The transformer and Integrated Circuit (IC) are difficult to test, so just use them and hope for the best.
These instructions assume that the inverter will use a 9 volt battery and be intended to supply B+ in a radio. The inverter is activated by the filament current, which is controlled by the radio's ON/OFF switch.
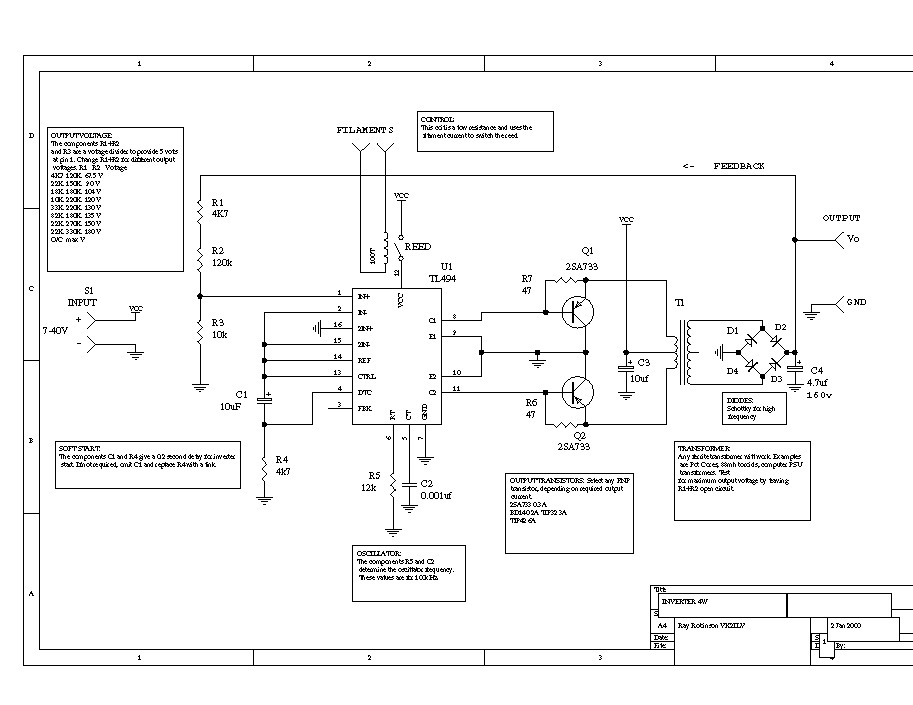
CIRCUIT
The inverter is based on the TL494 integrated circuit. This is a switching
regulator that will operate with an input voltage of between 7 and 40 volts
DC. This input voltage is supplied to the IC through a reed relay. The reed
in normally open. When filament current from a valve radio passes through
a coil, the magnetic field makes the reed close and energises the inverter.
The oscillator starts slowly (over several milliseconds) as C1 charges through
R4. If this is not required, omit C1 and replace R4 with a wire link. The
oscillator frequency is set by C2 and R5 and runs at 100 khz, for efficiency.
The oscillator saw tooth waveform can be seen at pin 5 on the IC using an
oscilloscope. The 2 internal switching transistors drive 2 external switching
transistors which switch the battery voltage into a transformer. The secondary
of the transformer is rectified and provides a DC voltage. The output frequency
is high, so ordinary silicon diodes are not suitable and schottky diodes
which switch fast and have a low voltage drop are preferred. Similarly, the
output capacitors have high frequency currents, and so special capacitors
are required also. The output voltage is fed back to the error amplifiers
and is compared to a 5 volt reference. This is done with a simple voltage
divider consisting of R1, R2 and R3. The 5 volt reference is applied to the
error amplifier, and the output voltage divider is also applied to the error
amplifier. The regulator adjusts until the inputs match, and so regulation
occurs. It regulates by adjusting the time that the output transistors are
turned ON. If the voltage is too low, they are turned ON longer, and if the
output voltage is too low, they are turned ON, but for a shorter duration.
The voltage divider is used to set the output voltage. It must be between
0 and the maximum output voltage of the transformer. The step up ratio of
the transformer determines the maximum output voltage. I have used R1 and
R2 as a series combination to set the voltage, as I could not get exactly
the desired output voltage using preferred values.
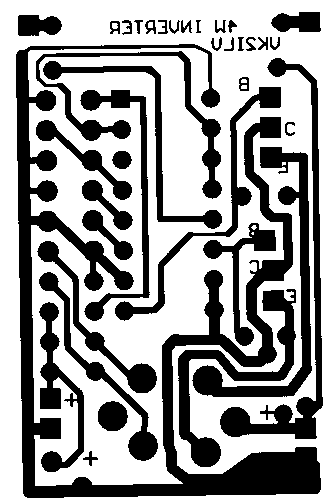
PRINTED CIRCUIT BOARD
The circuit board is very small and can fit inside the battery compartment of a radio, with a 9 volt battery. It is single sided with the components mounted on end. The IC diodes, and some resistors are from an old IBM computer power supply.
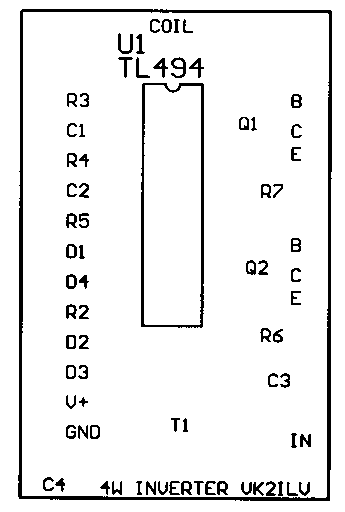
OVERLAY
The overlay shows the position of the components. The R1 and R2 combination, are twisted together and so only have 2 pads.
COIL
Make the coil for the reed by winding 100 turns of thick wire on a small former. Use lacquer to hold the turns in place. Clear nail polish works well. The empty plastic ink tube from a used ball point pen is a suitable former. The former should have an internal diameter suitable to enclose the reed, so that it can be inserted easily. The coil should be 1 inch long and 1/4 inch diameter to fit on the PCB. The reeds are fragile, so a tight fit and bending the leads are to be avoided. Test the coil and reed by passing 300 ma through the coil and checking for reed closure with an ohm meter. You can do this by using a 4.7 ohm resistor and a 1.5 v battery. This will produce a current of 300 ma which is roughly equivalent to six 1T4 battery valve filaments. Check that the voltage drop across the coil is about 0.1 volts or less.
TRANSFORMER
Use a small pot core and wind the primary and secondary. You need about a 15:1 ratio to get the correct output voltage from a 9 volt battery. Wind 220 turns of fine wire for the secondary. If required, you can bifilar wind 110 turns, join them in the correct phase, use the join as a centre tap, and this will produce half the output voltage, if dual voltages are required. Next wind the primary which is two windings of 15 turns of medium gauge wire.
COMPLETE ASSEMBLY
Place all the components in the PCB, solder them in.
Apply 9 volts DC of the correct polarity.
Check for high voltage output.
ALTERNATE STEP BY STEP ASSEMBLY
Place the IC on the PCB, in the correct orientation.
Add the timing components R5 and C2.
Add the soft start components R4 and C1 (if required).
Check the orientation of C1.
If not required, omit R4 and put a link in place of C1.
Add R1.
Add a test resistor of 1K from pin 8 to 9 v.
Add a second test resistor of 1K from pin 11 to 9 v.
Add a link for testing, in place of the reed.
Apply 9 volts DC.
Use an oscilloscope and check pin 5 for a saw tooth wave. This means the
oscillator is running.
Use an oscilloscope and check pin 8 for a square wave. This means the output
transistor is switching.
Use an oscilloscope and check pin 11 for a square wave. This means the other
output transistor is switching.
If OK, then remove the voltage and continue the assembly.
If not, then check the components and look for bad soldering.
Remove the 1K test resistor from pin 8.
Remove the 1K test resistor from pin 11.
Add the transformer.
Add R6 and R7.
Add the two switching transistors in the correct orientation.
Add the four diodes in the correct orientation.
Add C3 and C4.
Apply 9 volts DC.
Use a meter and check for 100 volts (approximately) at the output.
Use an oscilloscope and check pin 8 for a waveform. The waveform is theoretically
a square wave, BUT the transformer rings, and there will be a mixture of
square pulses, partial sine waves, and spikes. This is normal!
If OK, then remove the voltage and continue the assembly.
If not, then check the components and look for bad soldering.
Add R1 and R2 (having selected the values from the table).
Apply 9 volts DC.
Use a meter and check for the correct output voltage.
If OK, then remove the voltage and continue the assembly.
If not, then check the components and look for bad soldering.
Remove the reed test link.
Add the reed coil.
Add the reed, by using short wires from the PCB to the reed ends. Solder it
carefully.
Apply 9 volts DC.
Use a meter and check for output voltage. There should be none.
Use a 4.7 ohm resistor and a 1.5 v battery to produce a current of 300 ma
through the reed coil. This should turn the output voltage on.
If OK, then the inverter is complete.
If not, then check for a broken reed and bad soldering.
Make a metal box to house the inverter and battery. Insulate the inside,
or firmly mount the inverter PCB in the metal box.
Test on the radio.
PARTS LIST
R1 4K7 1/4 watt (select this value from the table
depending on the output voltage required)
R2 120K 1/4 watt (select this value from the table
depending on the output voltage required)
R3 10K 1/4 watt
R4 4K7 1/4 watt (use a wire link if soft start is
not required)
R5 12K 1/4 watt
R6 47 1/4 watt
R7 47 1/4 watt
C1 10uF 15v Tag Tantalum
C2 0.001uF 50v polycarbonate
C3 10uF 15v Tag Tantalum
C4 4.7uF 100v electrolytic (special capacitor for switching
supplies)
D1 100ma 200v PIV schottky
D2 100ma 200v PIV schottky
D3 100ma 200v PIV schottky
D4 100ma 200v PIV schottky
Q1 2SA733 PNP 200ma
Q2 2SA733 PNP 200ma
U1 TL494 IC
T1 Pot core, primary 30 turns centre tapped, secondary 220
turns.
REED 500ma
Coil 100 turns
Most of these components can be salvaged from an old PC switching power supply.
MORE INFORMATION
Recycling Computer Power Supplies
Computer Power Supply Controllers
Inverter noise
Circuit (18k)
Printed circuit Board (10k)
Overlay (8k)
Automatic Control of Battery Eliminators
Automatic Control of Inverters